
 US Dollar

2025 Dec 30th
Your Guide to Stainless Steel Pan Cleaner
Your Guide to Stainless Steel Pan Cleaner
The secret to a great stainless steel pan isn't just how you cook with it—it's how you clean it. While a quick scrub with soap and water handles daily messes, a specialized, non-abrasive cleaner is your best friend for tackling the tough stuff. For the stubborn grease, burnt-on food, and mysterious discolouration, a dedicated cleaner is what protects your investment and keeps your pans performing beautifully.
Why Your Stainless Steel Pans Need Special Care
Let's be real for a second. We've all been there: staring at a beautiful stainless steel pan covered in stubborn burnt-on bits, a greasy film, or those weird rainbow stains that pop up out of nowhere. It can be frustrating. High-quality cookware is a serious kitchen investment, and protecting it means using the right approach—not just more elbow grease.
Using a cleaner made specifically for stainless steel isn't just about getting that mirror shine back. It's about maintaining the integrity of the pan itself. These pans are prized for their non-reactive surface, which is a fancy way of saying they won't make your tomato sauce taste metallic. Proper cleaning is what keeps that surface pristine.
Protecting Your Culinary Investment
When old food residue or grease builds up, it creates an uneven cooking surface. This leads to hot spots where food is far more likely to burn, creating a vicious cycle. Over time, this buildup can become carbonized, making it almost impossible to remove and messing with how evenly your pan heats. This is exactly why a little specialized care goes a long way.
The demand for this kind of cookware shows just how important proper maintenance has become. In Canada, stainless steel cookware is a huge piece of the kitchen appliance market, mostly because people are looking for durable, health-conscious cooking gear. Frying pans alone make up about 28% of all stainless steel cookware sales, which tells you how essential they are in home kitchens. This trend is all about consumers understanding the value of premium tools and having concerns about non-stick coatings. You can discover more insights about the cookware market and its growth.
The goal isn't just to scrub harder; it's to work smarter. A good cleaner has two jobs: remove tough, cooked-on food without using harsh abrasives, and polish the surface to help prevent future sticking and stains.
More Than Just a Pretty Pan
A well-maintained pan simply works better and lasts longer. Here's why a targeted cleaning strategy is so critical:
- Performance Longevity: The right cleaning routine prevents the buildup of polymerized oil (that sticky, brownish film) and food bits that get in the way of good heat transfer and cause food to stick.
- Surface Integrity: Using non-abrasive cleaners and the right tools protects the pan's finish from tiny scratches and pits, which can become traps for food and bacteria.
- Aesthetic Appeal: Let's face it, we want our pans to look good. A dedicated stainless steel cleaner gets rid of that annoying heat tint (the blue or rainbow stains) and water spots, keeping your cookware looking brand new.
Ultimately, treating your stainless steel pans with the care they deserve turns them from a point of frustration into a source of pride. This guide will walk you through the exact methods and products you need to solve every cleaning challenge, from light daily washing to restoring a scorched pan.
Matching the Right Cleaner to the Mess
Think of cleaning your stainless steel pans less like a chore and more like solving a puzzle. Grabbing any old cleaner off the shelf won't always bring back that mirror-like shine. The real secret is to correctly identify the problem on your pan and then match it with the right type of cleaning agent. It's the difference between five minutes of easy work and half an hour of frustrating scrubbing.
This simple decision tree can help you figure out where to start.
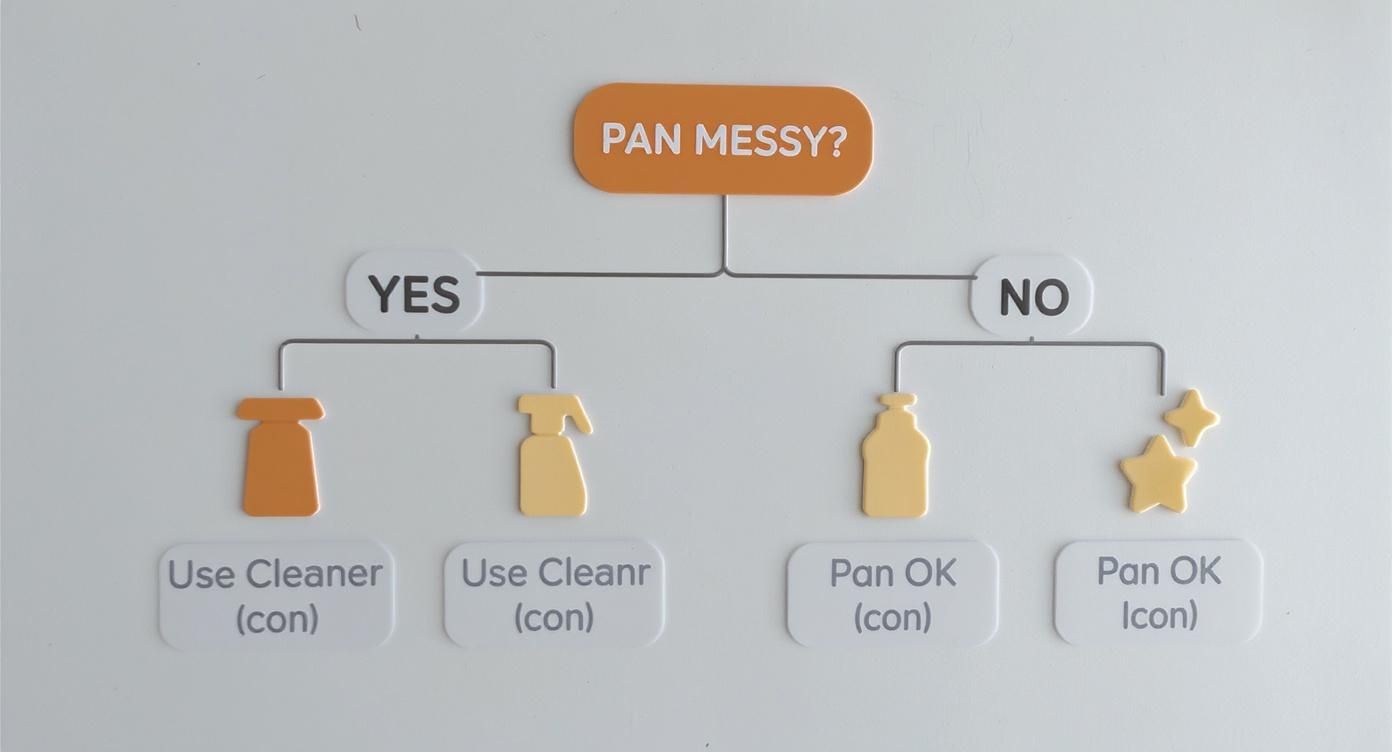
As you can see, the first question is whether you even need a specialized cleaner, guiding you toward the right action to keep your pan in top shape.
Your Stainless Steel Pan Cleaning Cheat Sheet
To make things even simpler, here's a quick reference guide. Just find the problem you're dealing with in the first column to see exactly what you need.
| Cleaning Challenge | Best Cleaner Type | Real-World Example | Our Product Recommendation |
|---|---|---|---|
| Light Grease & Water Spots | Gentle, Non-Abrasive Polish | Wiping away the light film after sautéing veggies. | A simple liquid stainless steel polish or daily cleaner. |
| Stubborn Food Bits | Mild Abrasive | The browned bits stuck on after searing a steak. | A powder cleaner like Bar Keepers Friend made into a paste. |
| Rainbow Discolouration | Acidic Cleaner | That bluish "heat tint" from accidental overheating. | A specialized liquid cleaner or an acidic powder like Bar Keepers Friend. |
| Tough, Baked-On Grease | Alkaline Cleaner (Degreaser) | The sticky, polymerized grease left after frying bacon. | A heavy-duty, commercial-grade alkaline degreaser like Ecolab Greasestrip Plus Gel. |
This table should get you on the right track 99% of the time, saving you guesswork and making sure you grab the right tool for the job.
Gentle Cleaners for Daily Upkeep
For everyday cleaning—like those light films from cooking vegetables or minor water spots—you don't need to bring out the heavy artillery. A gentle, non-abrasive polish or liquid cleaner is your best friend here. These formulas are made to lift light grease and restore lustre without scratching the pan's delicate surface.
Think of them as the daily maintenance crew for your cookware. They're perfect for a quick wipe-down after hand-washing to stop the gradual buildup that leads to bigger headaches down the road.
Mild Abrasives for Stubborn Food Residue
What about those more frustrating messes? I'm talking about the browned bits (fond, if you're feeling fancy) stuck to the bottom after searing chicken, or a ring of cooked-on sauce that just laughs at regular dish soap. This is where a mild abrasive powder cleaner becomes your most valuable player.
Products like Bar Keepers Friend are legendary in kitchens for a reason. They contain fine, gentle abrasive particles that give you just enough scrubbing power to lift stuck-on food without gouging the steel. The trick is to create a paste with a bit of water and gently work it into the problem areas. This targeted approach lets you apply pressure only where it's needed, protecting the rest of your pan.
The real value of a product like this is its versatility. It can handle moderate food residue, polish away dullness, and even help with minor heat tint, making it an essential item in any kitchen that uses stainless steel.
Acidic Cleaners for Mineral Deposits and Heat Tint
Have you ever noticed a faint, rainbow-like shimmer on your pan after heating it a bit too high? That's called heat tint. It's a common and harmless reaction caused by the chromium oxide layer on the steel thickening from the heat. In a similar vein, hard water can leave behind chalky white mineral deposits.
For these specific issues, an acidic cleaner is the perfect solution. The mild acid, often oxalic or citric acid, works on a chemical level to dissolve these mineral-based stains effortlessly. It restores the pan's clean, uniform silver finish, often without any real scrubbing. You can find specialized liquid cleaners, or even a product like Bar Keepers Friend which has an acidic base, to wipe these blemishes away.
Alkaline Cleaners for Cutting Through Heavy Grease
Now, let's tackle the aftermath of cooking something really rich and fatty, like a batch of bacon or a perfectly seared duck breast. This leaves behind a stubborn, polymerized layer of grease that soap and water barely touch.
This is a job for an alkaline (or basic) cleaner. Alkaline solutions are pros at saponification—a chemical process that literally turns tough fats and oils into a soap-like substance that you can easily wash away. A heavy-duty degreaser like our Ecolab Greasestrip Plus Gel will cut through that greasy buildup like magic, saving you a ton of elbow grease.
The demand for these kinds of smart, targeted cleaning solutions is growing fast. In 2021, the North American stainless steel cleaner market was valued at around USD 517.6 million and is on track to hit USD 623.4 million by 2025. Canada's piece of that pie is significant, projected to be about USD 66.8 million in 2025, driven by a consumer shift toward effective and eco-friendly formulas. You can read more about the stainless steel cleaner market trends to see how the industry is evolving. By understanding which cleaner to use, you're not just cleaning your pan—you're working smarter, not harder, to get a perfect result every time.
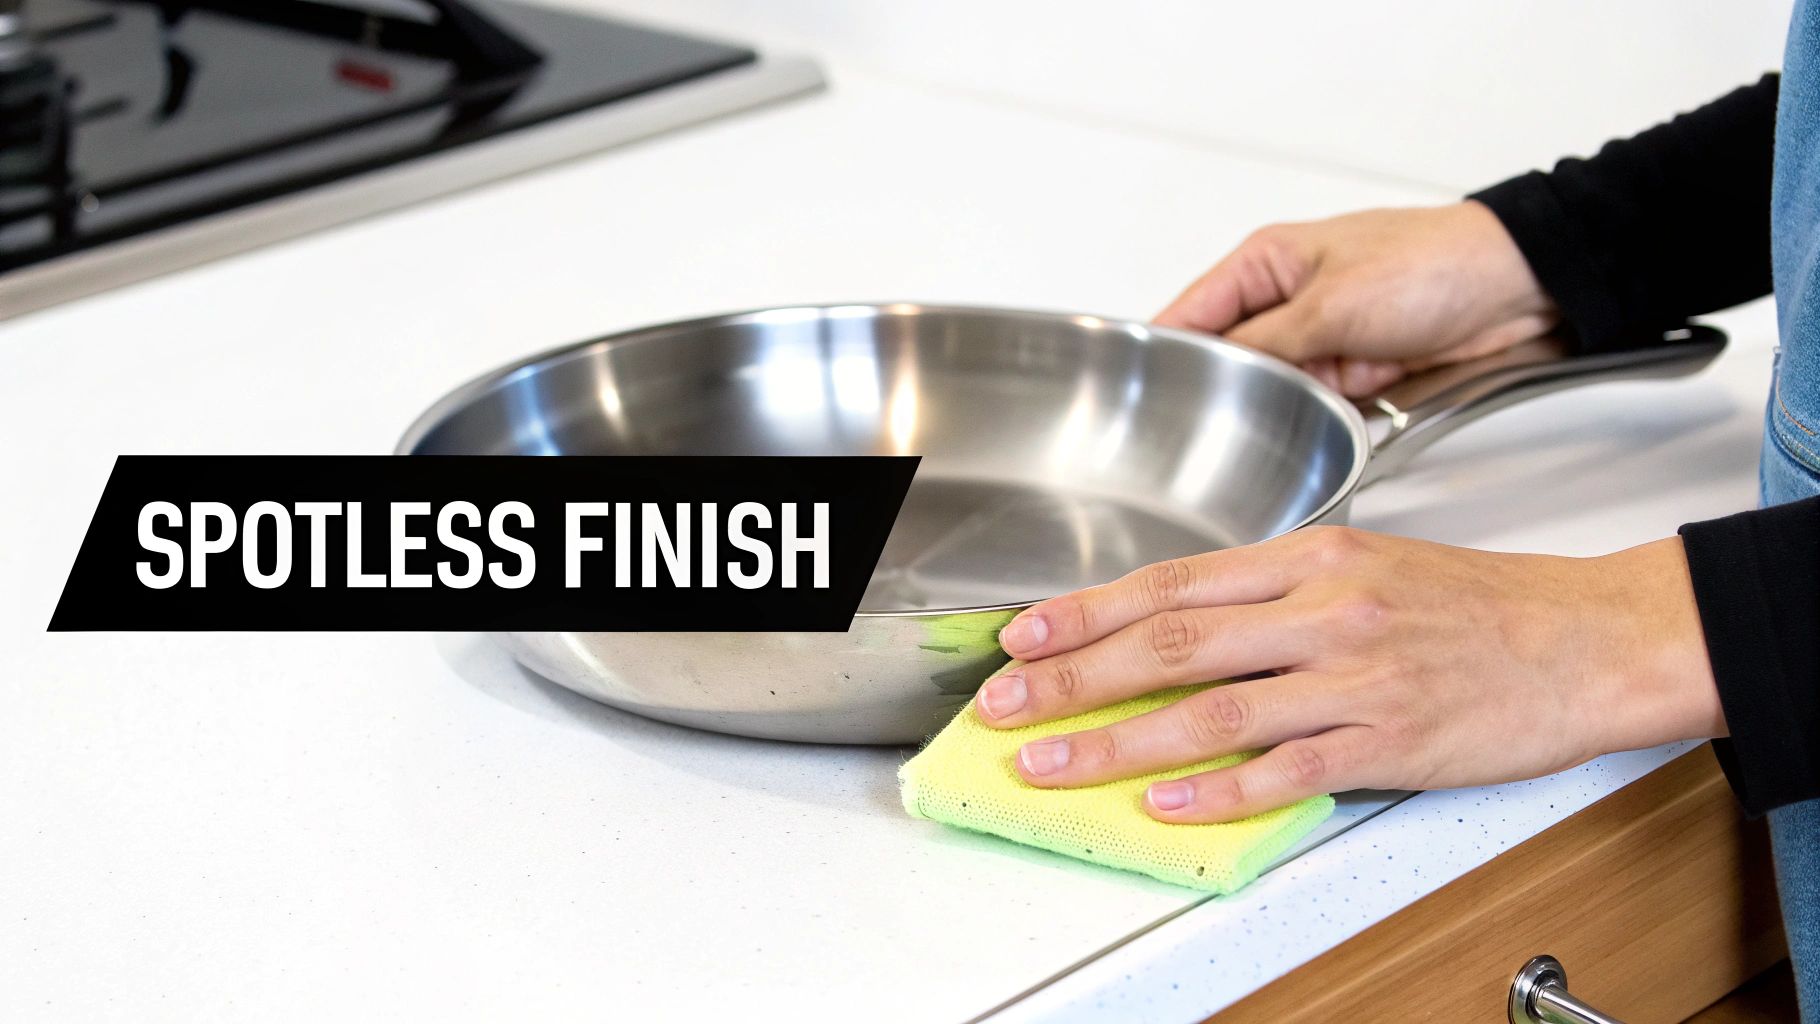
Proven Methods for a Spotless Finish
Picking the right stainless steel pan cleaner is half the battle. The other half is knowing how to use it properly to get the job done without endless scrubbing. Forget those generic instructions on the back of the bottle. This is your field-tested playbook for bringing any stainless steel pan back to its original, gleaming finish, no matter what you've cooked in it.
We'll break down the specific techniques for four common scenarios—from a simple post-dinner cleanup to a full-blown, burnt-on disaster. Each method is designed to be effective and efficient, helping you get the best results from your cleaning products without damaging your valuable cookware.
Tackling Daily Grime and Light Residue
The easiest mess to clean is the one that hasn't had time to dig in. For everyday cooking—sautéing vegetables, whipping up a quick pan sauce—the best defence is a good offence. This quick, preventative cleaning is what stops minor residues from becoming major headaches.
Once you're done cooking and the food is plated, let the pan cool for a few minutes. Whatever you do, don't plunge a hot pan into cold water. That sudden temperature change, known as thermal shock, can cause the metal to warp for good.
When the pan is warm but safe to handle, give it a rinse under warm water. A few drops of mild dish soap and a gentle wipe with a non-abrasive sponge or cloth is all it takes. This simple step lifts most of the food particles and oils before they get a chance to bond to the steel.
A key takeaway here is consistency. A quick, two-minute wash after each use is far more effective in the long run than a 20-minute scrubbing session once a week. It keeps the pan's surface smooth and less prone to sticking over time.
Removing Stubborn Food Residue
What about those jobs that are a little more stubborn? Think of the browned bits left after searing a steak, or the sticky glaze that caramelized just a bit too much. This is where a gentle, homemade abrasive paste can work wonders without reaching for harsh chemicals.
For this, baking soda is your secret weapon. After a quick wash with soap and water to clear any loose stuff, sprinkle a generous layer of baking soda across the bottom of the pan. Add just enough water to form a thick paste, about the consistency of toothpaste.
Using a soft sponge, work the paste into the stuck-on food with gentle, circular motions. The baking soda provides just enough grit to lift the gunk without scratching the stainless steel. For tougher spots, let the paste sit for about 15-20 minutes before giving it another scrub and rinsing it all away.
Conquering Burnt-On Disasters
We've all been there. The phone rings, you get distracted, and your simmering sauce transforms into a black, carbonized nightmare fused to your favourite pan. This calls for a more robust approach that uses heat, moisture, and a powerful stainless steel pan cleaner.
First, use a wooden spoon or spatula to scrape out any loose, chunky bits. Then, put the pan back on the stove and add about an inch of water—just enough to cover the burnt mess. Bring it to a gentle simmer.
As the water heats, keep scraping gently with your wooden spoon. The heat and steam will start to soften and loosen that carbonized layer in a process called deglazing. After simmering for 5-10 minutes, turn off the heat and carefully pour the water out.
Now it's time for the heavy-duty help. While the pan is still warm, bring in a specialized cleaning paste. A product like our Ecolab Greasestrip Plus Gel is specifically designed to dissolve tough, baked-on grease and carbon. Just follow the product instructions, let it sit for the recommended time, and then scrub with a non-abrasive pad. This one-two punch will lift even the most tragic kitchen messes.
Banishing Rainbow Heat Tint
Ever notice that shimmering, rainbow-like discolouration on your pan? That's not a stain—it's called heat tint. It happens when the pan gets a little too hot, causing the protective chromium oxide layer on the surface to thicken. It's completely harmless, but it can mess with your pan's pristine look.
Luckily, the fix is incredibly simple and just requires a mild acid to reverse the effect.
- White Vinegar: For most mild cases, a simple wipe-down with distilled white vinegar is all you need. Dampen a microfibre cloth with vinegar and rub the affected areas. You should see the tint vanish almost instantly.
- Acidic Cleaners: If the heat tint is more pronounced, a targeted stainless steel pan cleaner with an acidic base is your best bet. Make a paste with a powder cleaner or use a specialized liquid formula, applying it directly to the discoloured area.
After treating the heat tint, always give the pan a final wash with warm, soapy water to remove any acidic residue. Dry it thoroughly with a clean towel. This last step prevents water spots and restores that beautiful, uniform shine, making your pan look brand new again.
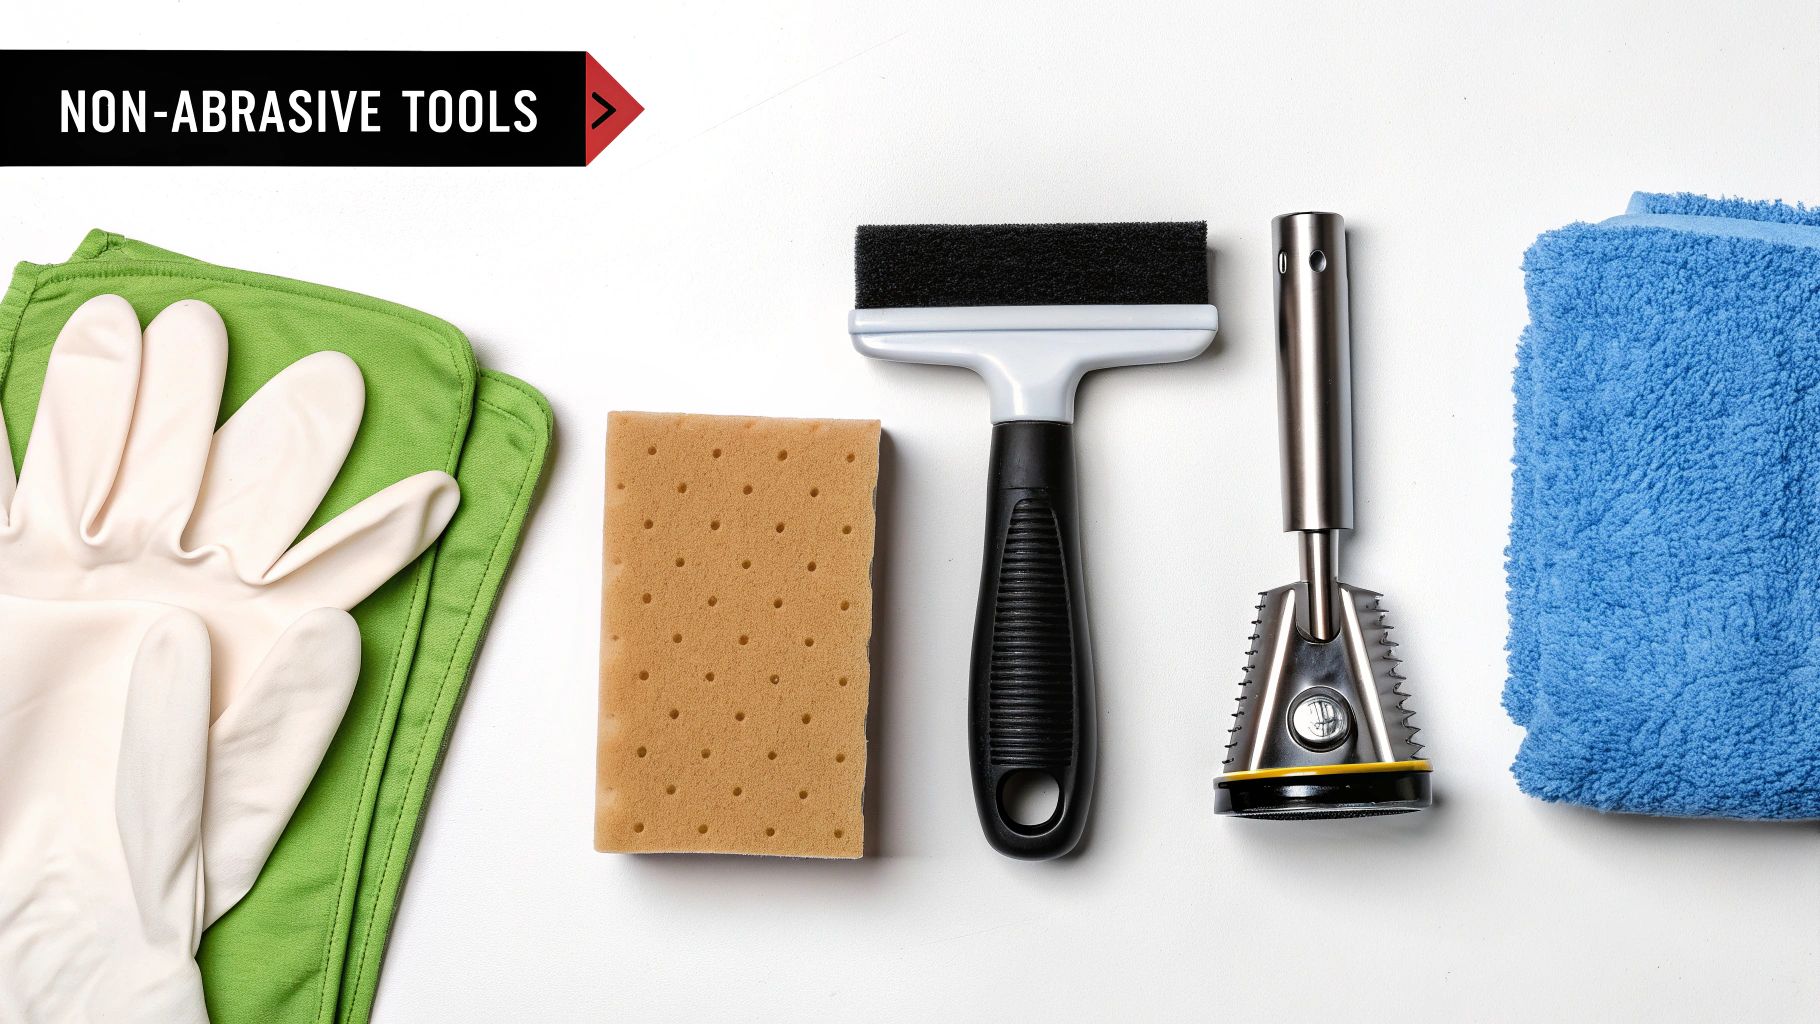
Choosing the Right Tools for the Job
Even the best stainless steel pan cleaner in the world will let you down if you're using the wrong tools. Picking the right equipment isn't just about making the job easier—it's about protecting your pan's surface from damage that you just can't undo. The right gear is what keeps your cookware looking brand new and performing beautifully for years.
The main goal here is simple: get rid of the food and stains without creating micro-scratches. Those tiny abrasions are a bigger deal than they seem. They dull the pan's finish and, worse, create a rough surface where food is more likely to stick next time you cook. That just starts a frustrating cycle of tough cleaning jobs.
Your Essential Cleaning Toolkit
To get that professional-level clean while keeping your pan in top shape, your toolkit should be all about gentle, non-abrasive options. You don't need a drawer full of fancy gadgets, just the right items that work with your cleaner, not against it.
Your go-to essentials should include:
- Non-Abrasive Sponges: Always look for sponges specifically labelled as non-scratch. The soft side is perfect for everyday washing, and the gentle scouring side gives you just enough grit to tackle stuck-on bits without causing any harm.
- Microfibre Cloths: These are absolute must-haves. I keep one for applying liquid cleaners and polishes, and a separate clean, dry one for buffing the pan after it's been washed. That final buff is the secret to getting rid of water spots and bringing back that brilliant, mirror-like shine.
- Soft-Bristled Brushes: For those stubborn particles that get stuck in corners or around the handle rivets, a simple nylon brush is a fantastic tool. It lets you apply focused pressure right where you need it, without any worry of scratching the steel.
- Wooden or Silicone Scrapers: When you're facing a seriously burnt-on mess, never, ever reach for a metal utensil. A wooden spoon or a firm silicone scraper can break up the worst of the debris—especially if you're deglazing with a bit of water—without gouging the pan.
The rule of thumb is simple: if a tool feels like it would scratch your fingernail, it will definitely scratch your stainless steel pan. Always err on the side of caution and choose softer materials.
Tools to Avoid at All Costs
Knowing what not to use is just as important as knowing what to use. Some common kitchen tools are the sworn enemies of your stainless steel cookware's finish. Using them even once can cause permanent, visible damage.
The number one offender is steel wool. It might seem like a quick fix for a burnt disaster, but it will leave behind a web of deep, ugly scratches. In the same category, you should avoid any highly abrasive scouring pads or harsh, gritty powdered cleaners that aren't specifically made for stainless steel. These aggressive tools will strip away the pan's smooth finish, wrecking its non-stick properties and looks forever.
Safety First When Cleaning
Once you step up to more powerful, commercial-grade cleaners, personal safety has to be your top priority. Many of the most effective degreasers and specialized formulas need to be handled carefully to avoid skin irritation or breathing in fumes.
Always wear protective gloves, especially when you're working with strong alkaline or acidic cleaners. Good kitchen ventilation is also crucial; crack open a window or turn on your range hood fan to keep the air flowing. Taking these simple steps makes the whole process both safe and effective.
To make sure you have the right gear, check out our selection of durable cleaning gloves and protective accessories, designed to keep you safe while you bring your pans back to life.
How to Prevent Sticking and Stains
The easiest way to clean a stainless steel pan is to avoid making a mess in the first place. It sounds simple, but it's true. While a top-notch stainless steel pan cleaner is a must-have for those inevitable tough jobs, mastering a few core cooking techniques will drastically cut down on how often you need it. Think of this as proactive pan care.
By changing a few habits, you can stop food from sticking and prevent stubborn stains, which makes cleanup almost effortless.
These are the same tips pros use in busy kitchens. They won't just save you from scrubbing; they'll make you a better, more confident cook. It all comes down to proper preheating, managing your heat, and what you do right after the cooking is done.
Master the Art of Preheating
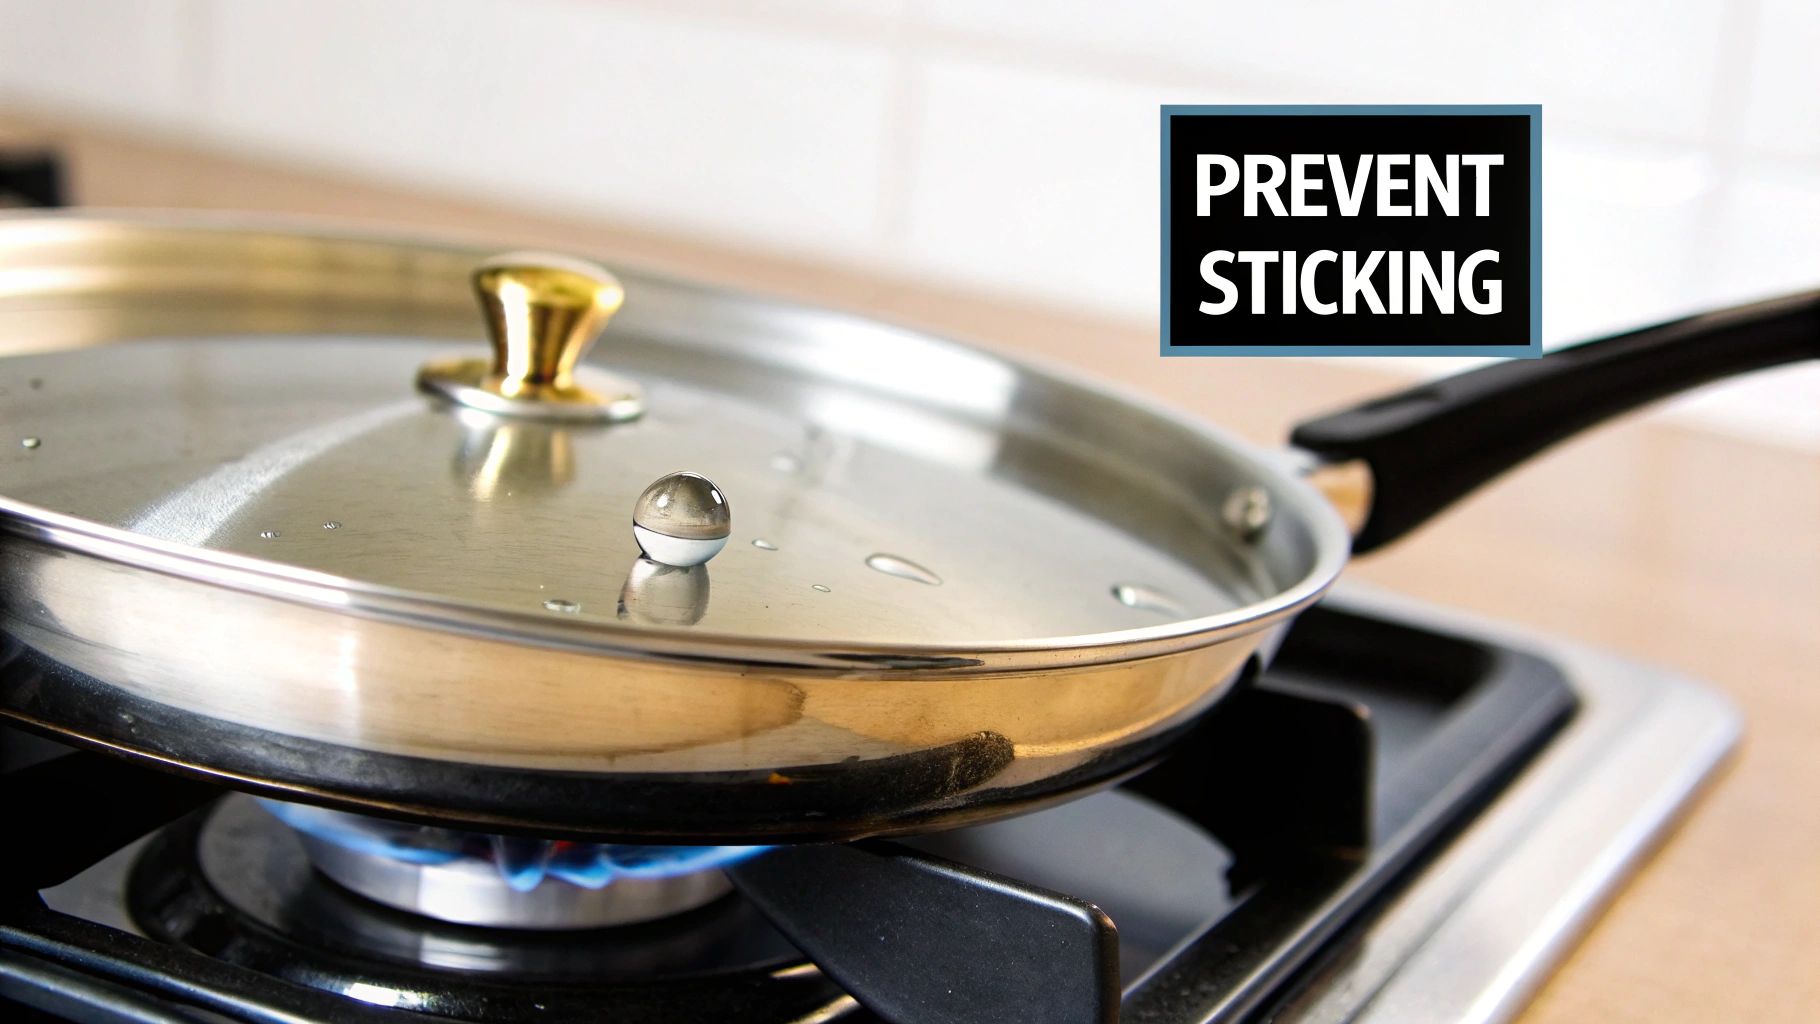
One of the biggest culprits behind stuck-on food is a pan that isn't properly heated. Tossing ingredients, especially proteins like chicken or eggs, into a cold stainless steel pan is a guaranteed recipe for sticking. The real secret to creating a naturally non-stick surface is getting the preheating just right. The "water drop test" is your most reliable guide here.
Put your dry pan over medium heat for a couple of minutes. To see if it's ready, just flick a few drops of water onto the surface.
- If the water sizzles away instantly: Your pan is too hot. Lower the heat and let it cool for a moment.
- If the water just sits there and bubbles lazily: It's not hot enough yet. Give it another minute.
- If the water forms a single, shimmering ball that glides around like mercury: Perfect. Your pan is at the ideal temperature.
This is called the Leidenfrost effect. It means the pan is so hot that a thin layer of steam forms under the water (and your food), acting as a temporary non-stick barrier.
Choose the Right Fat for the Job
Once your pan has passed the water drop test, it's time to add your cooking fat. The type of oil or butter you use really matters. Different fats have different smoke points—that's the temperature where they start to break down and burn, creating a sticky, scorched mess.
For example, butter has a low smoke point, making it perfect for gentle cooking like scrambling eggs on low. Olive oil works well for sautéing vegetables over moderate heat. But for searing a steak at high temperatures, you'll need an oil with a high smoke point, such as grapeseed or vegetable oil. Always add the fat to your preheated pan and let it shimmer before the food goes in.
One of the most common mistakes is adding oil to a cold pan and heating them up together. This essentially bakes the oil onto the steel, creating a gummy residue that's a nightmare to clean. Always heat the pan first, then the oil.
Practice Smart Heat Management
Stainless steel is a fantastic conductor of heat, which means you almost never need to crank the stove to high. Cooking with excessively high heat is the number one cause of scorching, burnt-on food, and that ugly rainbow-coloured heat tint. For the vast majority of your cooking, medium heat is your best friend.
The only time you should really use high heat is for boiling liquids, like water for pasta. For everything else—from getting a perfect sear on a piece of fish to frying an egg—sticking to a moderate temperature will give you a beautiful crust without creating a carbonized disaster.
Proactive Post-Cooking Habits
Your job isn't quite finished when the food hits the plate. A couple of simple habits right after cooking can make cleanup ridiculously easy.
While the pan is still warm (but not blazing hot), pour in a little bit of liquid—water, wine, or broth works great—to deglaze it. You'll hear a satisfying sizzle as the liquid instantly lifts most of those browned, stuck-on bits (also known as "fond," which is packed with flavour). Use a wooden spoon to gently scrape the bottom, and you'll find nearly all the residue comes right off.
This kind of proactive care is becoming more common. In fact, analysis of the Canadian stainless steel cleaner market shows a growing demand that reflects these changing consumer habits. North America made up over 40% of the global market revenue in 2025. With a sustained growth rate of nearly 4.9%, the need for effective cleaning solutions is clearly on the rise in both homes and professional kitchens. Find more details on the stainless steel cleaner market analysis here. By taking these preventative steps, you're aligning with a smarter approach to cookware maintenance, keeping your pans in top shape with far less effort.
Common Stainless Steel Cleaning Questions
Even with the best techniques, some questions pop up time and time again. We've been helping customers troubleshoot their cookware for years, so we've gathered the most common queries right here. Let's get you some direct, no-nonsense answers to keep your pans in perfect condition.
Can I Use Steel Wool On A Really Tough Burnt Spot?
In a word: no. Please, step away from the steel wool.
While it might seem like the only solution for a scorched-on disaster, you'll permanently scratch and damage your pan's smooth surface. Those tiny scratches create a rough texture where food will stick even more easily in the future, turning every future cleanup into a frustrating battle.
For severe burns, patience is your best friend. Start by simmering a bit of water and baking soda in the pan to loosen that carbonized mess. From there, a non-abrasive sponge paired with a specialized, powerful cleaner like Ecolab Greasestrip Plus Gel is the safest and most effective approach. It gets the job done without wrecking your investment.
What Is The Rainbow Stain On My Pan And How Do I Get Rid Of It?
That bluish, rainbow-like shimmer on your pan has a name: heat tint. It's a completely harmless chemical reaction that happens when the pan gets a little too hot, causing the protective chromium oxide layer to thicken. It doesn't affect performance one bit, but it can be an eyesore.
Luckily, getting rid of it is surprisingly simple because it reacts to mild acids.
- For light tint: Wiping the pan with a cloth dampened in white vinegar is often all it takes. You'll see it vanish instantly.
- For a more stubborn tint: A targeted stainless steel pan cleaner with an acidic base, like a powder made into a paste, will restore its original silver shine in seconds.
Just remember to wash the pan with soap and water after using any acidic solution to neutralize any residue.
Is It Truly Safe To Put My Stainless Steel Pan In The Dishwasher?
Here's our honest take: while many manufacturers label their pans "dishwasher safe," we strongly recommend hand-washing as a rule.
Over time, the combination of harsh dishwasher detergents and extremely high heat is just too tough on cookware. It can lead to pitting, discolouration, and a dulling of the pan's beautiful finish.
A quick, two-minute hand-wash with gentle soap and warm water is a small habit that pays off big time. It protects your investment and ensures your pan performs at its best for years, preserving both its function and its appearance.
What's The Best Cleaner For Everyday Use On My Pan?
For most daily cleaning, you don't need to bring out the heavy-duty stuff. If you clean your pan shortly after cooking, warm soapy water and a soft cloth are usually all you need to handle light grease and food bits. This simple habit prevents buildup before it even starts.
If you notice a slight greasy film that soap alone doesn't quite cut through, a simple paste made from baking soda and water works wonders. It's a gentle but effective scrub that provides just enough grit to lift residue without being abrasive.
For those who want a dedicated product for that final polish, we suggest a gentle, non-abrasive liquid cleanser formulated for stainless steel. You can explore our selection of professional-grade cleaning chemicals to find the perfect daily maintenance solution. Save the more powerful cleaners for the tougher, less frequent jobs.
At Chicken Pieces, we provide the professional-grade supplies you need to keep your kitchen running smoothly, from high-performance cleaners to essential cooking ingredients. Explore our full range of janitorial and sanitation products to find the perfect stainless steel pan cleaner for your home or business at https://www.chickenpieces.com.