
 US Dollar

2026 Feb 8th
How to Make Slushies at Home: A Simple Guide
Making a slushy at home is way easier than you might think. Whether you're whipping up a quick treat in the blender, doing a fun project with a freezer bag, or aiming for café-quality results with a dedicated machine, it all comes down to a few key details.
The real secret is getting the ratio right—typically 1 part syrup to 5 parts water—and making sure the mixture is constantly moving to stop it from freezing into a solid block of ice.
Your Guide to Perfect Homemade Slushies
So, you want to create those refreshingly perfect slushies right in your own kitchen? You've come to the right place. This is your go-to guide, whether you're planning a fun afternoon treat for the family or looking to add a new bestseller to your café menu.
We're going to break down three simple but effective methods to master the art of the homemade slushy. You'll find the perfect technique for any occasion, no matter what equipment you have on hand.
We'll cover the blender method for pure speed, the freezer bag trick for a no-fuss activity, and a countertop slushy machine for when you need professional-grade results. That iconic icy texture comes from creating fine, uniform ice crystals, and we'll show you exactly how to achieve it every single time. Forget the guesswork; we're giving you clear, actionable steps that lead to delicious, icy perfection.
Finding Your Best Method
To get you started, let's look at a quick overview of each approach. First, think about your goal. Are you after instant gratification? A fun project to do with the kids? Or a reliable way to serve a whole crowd? Each method has its own perks.
| Method | Best For | Time | Key Benefit |
|---|---|---|---|
| Blender Method | Quick, single servings | Under 5 minutes | Uses common kitchen equipment |
| Freezer Bag Method | Fun activity with kids | 10-15 minutes | No special appliances needed |
| Slushy Machine | Large batches & events | 30-60 minutes | Perfect, consistent texture |
Of course, the foundation of any great slushy is an authentic, flavourful base. To get started on the right foot, you can't go wrong with the classic taste of authentic Slush Puppie syrups from Chicken Pieces. Using a high-quality syrup not only guarantees fantastic flavour but also provides the ideal sugar content needed for that perfect, scoopable consistency. We'll link you to all the right supplies for each method as we go.
So you want to make a slushy. Before you reach for the ice and syrup, the first question to ask yourself is: what kind of slushy experience am I after?
Are you craving a single, perfect slushy right this second? Or are you looking for a fun weekend project with the kids? Maybe you're the hero of the neighbourhood block party and need to serve a crowd. The right tool for the job really depends on your goal. Let's break down the best ways to get that perfect icy texture at home.
The Blender: For Instant Gratification
When you need a slushy now, the blender is your best friend. It's the undisputed champion of speed. If you have a decent blender sitting on your counter, you're less than five minutes away from a frosty treat, no special prep required.
This method is perfect for whipping up a solo drink or a quick round for two. Just toss in your ice, a good quality syrup, and some water, then let the blender do its thing. The real trick is to use the 'pulse' function. This gives you way more control, helping you break down the ice into those fine, snowy crystals instead of ending up with a chunky, uneven mess.
- Best for: Quick, individual slushies on a whim.
- Effort Level: Super low. You already have the gear.
- Texture: With a powerful blender, you can get it impressively smooth, though it might be a touch coarser than one from a dedicated machine.
- Cost: Basically free, assuming a blender is already part of your kitchen arsenal.
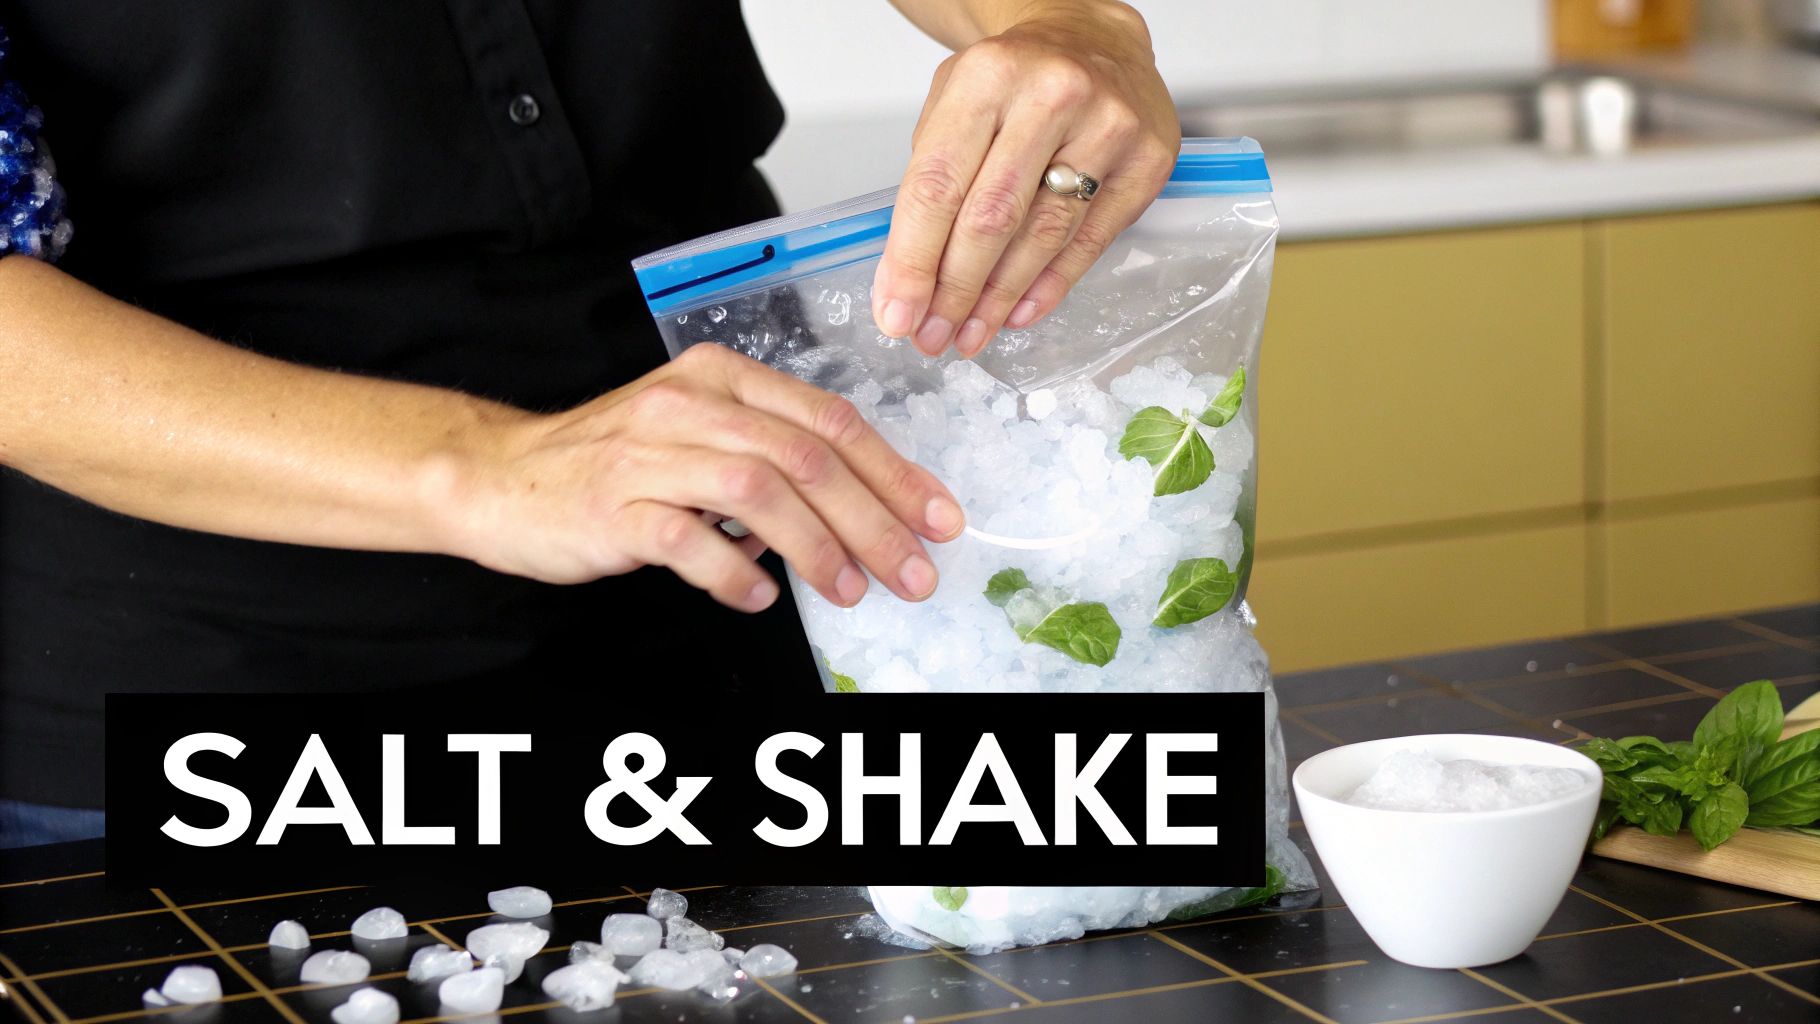
The Freezer Bag: A Fun Kitchen Science Experiment
Looking for an activity that doesn't involve plugging anything in? The freezer bag method is a blast. It's a fantastic project to do with kids, turning a simple treat into a hands-on science lesson about freezing points that they can actually eat.
You just need two freezer bags, your slushy mix, a bunch of ice, and some salt. The magic happens when the salt makes the ice super-cold, rapidly chilling the drink mix in the inner bag while you shake it all around. It takes about 10-15 minutes of shaking, but you end up with a surprisingly authentic slushy.
This method is less about perfection and more about the fun of making it. It's perfect for a lazy afternoon when you want an activity that ends with a sweet reward.
The Countertop Slushy Machine: The Enthusiast's Choice
For the true slushy aficionado—or anyone who's serious about serving drinks at an event—a dedicated countertop machine is the ultimate upgrade. These machines are engineered to do one thing and do it perfectly: create and maintain flawlessly smooth slushies for hours on end.
They work by slowly churning the mixture in a refrigerated bowl, which builds up fine ice crystals without letting the whole thing freeze solid. This makes them a total game-changer for parties, family get-togethers, or even a small café setup. Every single cup comes out just as good as the first.
If you're ready to get serious, investing in a machine is the way to go. For those looking to level up their slushy game, Chicken Pieces offers a selection of countertop slushy machines that deliver those professional, satisfying results every single time.
Mastering the Blender for a Quick Slushy Fix
When a slushy craving hits hard and fast, your kitchen blender is the quickest way to get that icy, flavourful fix. It's the perfect method for a single-serving treat without any real fuss. That said, turning a bunch of ice and liquid into a perfectly smooth slushy takes a little more technique than just hitting "on"—otherwise, you risk a watery, chunky disaster.
The absolute most critical part is getting the ice-to-liquid ratio right. A common mistake is adding way too much liquid, which just leaves you with a sad, thin drink. A solid starting point is a 2:1 ratio of ice to liquid. So, for every one cup of your prepared liquid (that's your syrup and water mixed together), you'll want about two cups of ice.
The Power of the Pulse
Instead of just letting the blender rip, the pulse function is your secret weapon here. Using short, controlled bursts gives you total control over the final texture. This is key because it stops the blades from creating heat through friction, which melts the ice far too quickly.
Pulsing breaks down the ice gradually, creating those fine, consistent snow-like crystals we're after. If you just blend continuously, you almost always end up with big ice chunks swimming around in a soupy liquid. A high-powered blender definitely helps, but it's the pulsing technique that truly delivers that classic, scoopable slushy consistency you get from a machine.
This flowchart breaks down the decision-making process, helping you pick the best slushy method for your situation.
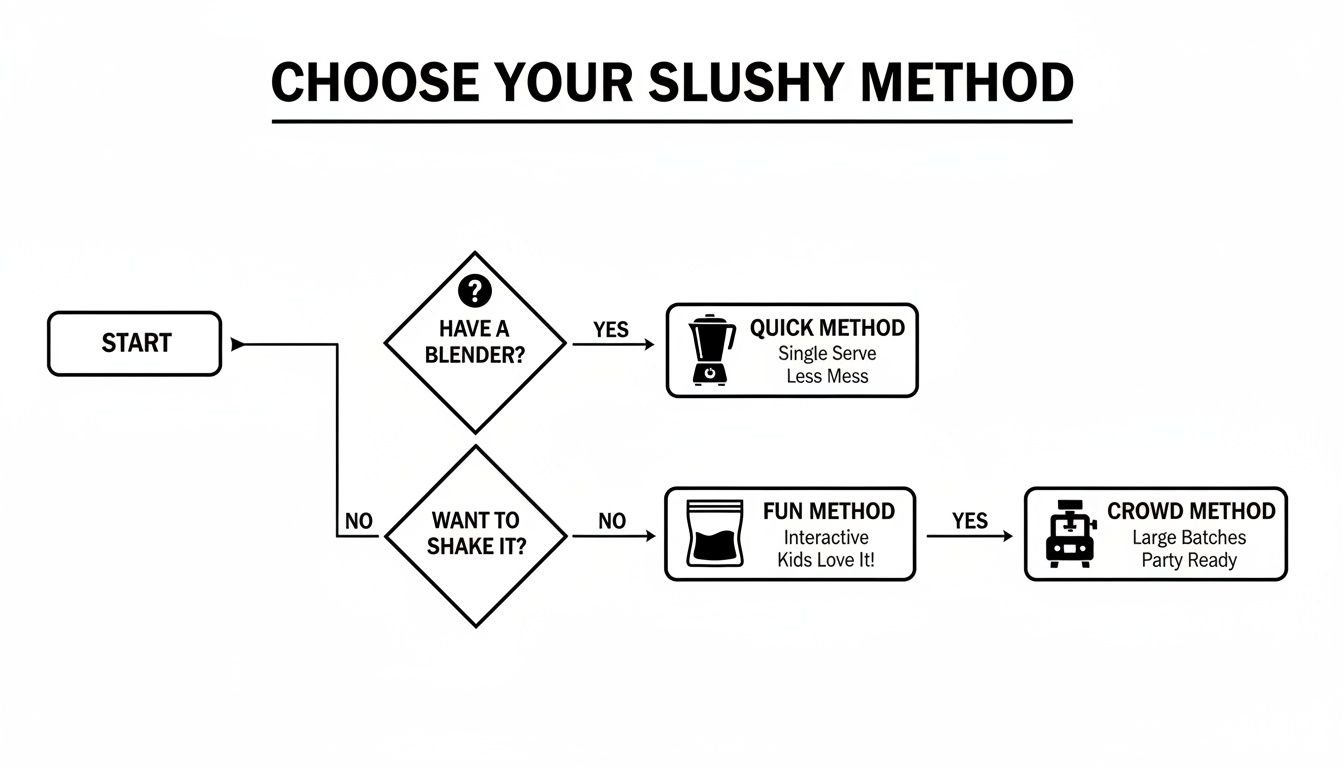
As you can see, for sheer speed, the blender is the clear winner, making it the perfect place to start your home slushy adventures.
A Classic Blender Slushy Recipe
Ready to give it a shot? This simple recipe is a fantastic starting point and uses authentic flavours for a real-deal experience. The measurements are designed for one generous serving.
What You'll Need:
- 30 ml (2 tbsp) of your favourite Slush Puppie syrup. The iconic Blue Raspberry Slush Puppie Syrup is the perfect choice for that nostalgic taste.
- 150 ml (⅔ cup) of cold water.
- Approximately 2 cups of ice cubes.
First, mix your syrup and cold water in a separate cup until they're completely combined. Next, add the ice to your blender, pour the liquid mixture right over the top, and pop the lid on tight.
Start pulsing the blender in short bursts until the ice is crushed into a fine, snowy texture. If it seems too thick, just add a splash more water. If it's too thin, toss in a few more ice cubes and give it a couple more pulses.
The most important tip? Serve it immediately. A blender-made slushy is at its absolute best right after mixing, before the ice and liquid have any chance to separate.
Quick Blender Troubleshooting
Even with a simple process, a few things can go sideways. If your blender is struggling to get going, it's usually because there isn't quite enough liquid to get the ice moving. Try adding a tablespoon of your pre-mixed liquid at a time to help it catch.
On the flip side, if your slushy is too watery, you've either used too much liquid or not enough ice. The great thing about the blender method is how forgiving it is—you can easily adjust by adding more of either ingredient until you hit that perfect consistency. To make experimenting fun and easy, it helps to have a variety of high-quality flavour bases on hand, like the single-flavour syrups available at Chicken Pieces.
The No-Fuss Freezer Bag Slushy Adventure
Don't have a blender or a fancy machine? No problem at all. You can still whip up an amazing slushy at home with just a couple of resealable bags, some ice, and a little kitchen science. This method is a fantastic, hands-on activity, especially for kids, turning a simple treat into an exciting project.
The real magic here is the simple but powerful interaction between ice and salt. Adding salt to ice drastically lowers its freezing point, making the icy slush in the outer bag intensely cold—far colder than 0°C. This super-chilled environment is what rapidly cools the slushy mix in the inner bag, forming those perfect ice crystals without needing any electricity.
Gathering Your Supplies
Before you start, you'll need a few basic items. This method is all about simplicity, so you probably have everything you need already.
- Two Resealing Plastic Bags: You'll need one smaller bag (sandwich size) and one larger bag (gallon size). Make sure they are both heavy-duty or freezer-grade to prevent any leaks or breaks from all the shaking.
- Your Slushy Mix: In a cup or bowl, combine 1 part syrup to 5 parts cold water. A classic flavour like Red Cherry or Blue Raspberry is always a crowd-pleaser.
- Ice: You'll need enough to fill the larger bag about halfway. Crushed ice works a bit faster, but regular cubes are perfectly fine.
- Salt: About half a cup of coarse salt, like rock salt or ice cream salt, works best. Table salt will do in a pinch, but you might need a little more of it to get the job done.
Creating Your Slushy
Once your supplies are ready, the real fun begins.
First, pour your pre-mixed syrup and water into the smaller bag. Seal it as tightly as you can, squeezing out as much air as possible to prevent it from popping open during the shaking process.
Next, fill the larger bag about halfway with ice and add the salt. Pop your sealed, smaller bag of slushy mix inside the big bag, right on top of the ice. Seal the large bag securely—again, pushing out any excess air is a good idea.
Now for the best part: get shaking! Wrap the bag in a tea towel to protect your hands from the extreme cold, then shake, massage, and agitate it for about 10 to 15 minutes. You'll actually feel the liquid inside the smaller bag start to firm up and turn into that perfect slushy consistency.
Tip: This is a great activity to get everyone involved. Take turns shaking the bag until your perfect slushy is formed. It's a simple way to make a delicious memory.
For a fun family slushy night, having a few flavours on hand makes the experience even better. You can find convenient multi-pack Slush Puppie syrups at Chicken Pieces, offering a variety that lets everyone pick their favourite. Once your slushy is ready, just snip a corner off the small bag, pour your masterpiece into a glass, and enjoy your perfectly chilled, homemade treat.
Leveling Up with a Countertop Slushy Machine
For the true slushy aficionado or a small business that needs perfectly consistent frozen drinks, a dedicated countertop machine is the ultimate upgrade. While blenders get the job done quickly and freezer bags are a fun DIY project, nothing comes close to the texture and reliability you get from a purpose-built machine.
These units are engineered to create flawless, uniform ice crystals every single time. They're the secret weapon for serving a crowd at a party or keeping customers happy at a small café without breaking a sweat.

The magic is in how they work. An internal cooling system chills the liquid mix while a slowly rotating auger (or paddle) constantly scrapes the inside of the freezing chamber. This continuous churning prevents large ice chunks from forming, giving you that signature smooth, scoopable texture that's impossible to nail with any other method.
Getting the Ratios Right
Unlike the more forgiving blender method, a slushy machine demands precision. The syrup-to-water ratio isn't just about flavour—it's critical to how the machine functions. The sugar in the syrup is what lowers the freezing point of the water, which is essential for creating "slush" instead of a solid block of ice.
Stick to the manufacturer's recommended ratio. For most commercial syrups, this is 1 part syrup to 5 parts water. Going rogue can strain the machine's motor and potentially cause serious damage over time. Always start with the official guidelines to protect your investment.
If you're ready to make that investment in quality and consistency, a great place to start is by exploring the range of professional countertop slushy machines at Chicken Pieces. These units are designed for continuous use, making them perfect for both enthusiastic home users and commercial settings.
Operational and Cleaning Essentials
Operating a countertop machine is surprisingly simple. Once you've mixed your syrup and water according to the instructions, just pour it into the machine's reservoir, flick the switch, and let it work its magic. Most machines will take between 30 to 60 minutes to get a room-temperature mix to that perfect slushy consistency.
Proper maintenance is the key to a long, productive life for your machine. After every use, you need to clean the unit thoroughly to prevent sticky sugar buildup and bacterial growth.
- Daily Rinse: Once the machine is off, drain any leftover mix. Give the bowl, auger, and dispensing tap a good rinse with warm water.
- Deep Clean: Follow the manufacturer's schedule for a full disassembly. Most models let you easily remove the bowl, auger, and seals for a detailed cleaning with a food-safe sanitiser.
- Lubrication: The moving parts, especially the seals and gaskets, need to be lubricated with a food-grade lubricant every so often to prevent leaks and keep everything running smoothly.
To keep your machine in top shape, you need the right supplies. For making larger batches, the commercial-sized Slush Puppie syrups from Chicken Pieces have the correct formulation for machine use and come in bulk sizes perfect for any event or business need.
Your Top Slushy Questions, Answered
Even with the best instructions, a few questions always pop up when you're trying to perfect your slushy game. Let's tackle some of the most common ones I hear, so you can get consistently delicious results every single time.
What Is the Perfect Syrup to Water Ratio?
The golden rule for almost every commercial slushy syrup, including the classic Slush Puppie flavours you know and love, is a 1 part syrup to 5 parts water ratio.
This 1:5 mix isn't just a random guess; it's carefully balanced to deliver that punchy flavour and, more importantly, the ideal sugar content needed for the perfect freeze. While you can tweak it slightly to suit your personal taste, I'd advise against straying too far. If you're using a countertop slushy machine, sticking to the manufacturer's ratio is critical, as the wrong sugar concentration can mess with how the machine freezes.
Can I Use Juice or Soda Instead of Syrup?
You can definitely experiment with juices and sodas, but just know the results won't be quite the same. The magic of a proper slushy syrup is its precise sugar formulation, which is what creates that iconic, fine-ice texture.
Full-sugar sodas and natural fruit juices can work in a pinch, but they often produce a softer, more sorbet-like consistency because their sugar levels are all over the map. Diet sodas are a definite no-go. With no real sugar, they'll just freeze into a solid, un-slushable block of ice. For that authentic taste and texture, a dedicated slushy syrup is always your best bet.
The Secret to a Perfect Slushy: It all comes down to two things: sugar and constant movement. Sugar lowers the freezing point of water, which is why your syrup ratio is so important. The movement—whether from a blender's blades, a machine's auger, or you shaking a bag—continuously breaks up the ice crystals as they form. This is what keeps the mixture "slushy" instead of just a solid chunk of ice.
How Long Does a Homemade Slushy Last?
A slushy you've just whipped up in a blender or a freezer bag is best enjoyed right away. At room temperature, it'll start to melt or separate in about 15-30 minutes.
A countertop slushy machine, on the other hand, is built for endurance. It's designed to hold that perfect slushy texture for hours, which makes it the ideal choice for parties or events where you need it on-demand.
Got leftovers from a blender batch? Here's a great trick: pour the slushy into an ice cube tray and freeze it. The next time you want a frosty treat, just toss those cubes back into the blender for a super-quick slushy refresh.
No matter which method you choose, the quality of your ingredients makes all the difference. For authentic flavours and professional-grade supplies that guarantee a perfect slushy every time, explore the full selection at Chicken Pieces. Find everything you need, from classic syrups to countertop machines, at https://www.chickenpieces.com/slushy-syrups/.